Tuesday, 28 May 2013

Now next is how to maintain sales quotation and sales order:

Following figure will show you how to go to the quotation:

After clicking on the quotes:


Sales Quote is the statement that you are going to send to your customer and then he will send you the purchase order according to what you have offered and what he need.
Important points:
1.       Enter the customer Id, this will help you to identify the specific customer.
2.       The Date on which you are writing this quotation.
3.       Good thru, the date by which goods are needed to be delivered.
4.       Quote no, the number of this quotation.
5.       When you will select the customer id the term column will be automatically filled.
Now after the summon from the customer you can change this quotation into sales order just by clicking on the convert button:


The following window will appear on your computer screen when you will click on the convert button:


Select the sale order option as shown and the quotation form will be automatically convert to sale order.
NOTE: You have to enter the SO # (Sale Order number) before proceeding.
 Sale Order is shown below:


Now we are going to learn how to maintain vendor credit memos

1st click on the task button and select vendor credit memos option as shown in the figure below:

After clicking on this option the following window will appear on your computer screen:

Basically this window is used to record Purchases return, means the things that you’re going to return to your vendors. This window contains different options:
1.       Vendor Id will be written in the vendor id bar.
2.       Date: The date at which you are making this document or recording this will be written in the date column.
3.       Credit no: The credit no will be written for the record.
4.       Terms: In this column the discounted term will be written that how much discount you are going to get from your vendor.
5.       When you will select the vendor then the tab will automatically change from “Apply to purchase” to “Apply to invoice no”.


Saturday, 18 May 2013

How to record any payment in peachtree software:

You can open the payment tab by clicking on the task button and select the payment:

By clicking on the payment option the following window of payment will be appear on your computer screen:

You can choose the vendor to whom you want to make the payment by clicking on the look up button as shown below:

The column of date will show you the date on which the payment order is written. If the payment will be made within 10 days then you will receive 2% discount as written in the terms when we were maintaining this vendor. If you want to record the discount you've to maintain an account in charts of account and select it in discount account option which is placed in the bottom of the page.
If you don’t have a purchase discount account in your charts of account you can make it just by clicking on the discount account column you can make it:

Now when you will select this column then you entry will be recorded and saved:

In the above figure you can see that the pay column is checked and the amount paid is decreased by the amount of discount, this means your total payment will be off 490,000/-.


Sunday, 12 May 2013

Now we will learn how to make a purchase order:


1st step is as usual you will execute the peachtree software and following window will appear on your computer screen.

When you’re making the purchase order you’ve to be sure that your charts of accounts, customers, vendors and inventory items are maintained. If you don’t know how to maintain charts of accounts, customers, vendors or inventory items you can visit my following blog links, they will guide you in maintaining these processes:
After you’re done with the necessary steps mentioned above now you can make the purchase order.
You can go to the purchase order window by different methods:
1.       By clicking on the task button:


2.       By clicking on the navigation aid button and from the 2nd column you can click on the purchase order option:


When you will click on the option of the purchase order you will see the following window on your computer screen:

Now this window contains different boxes whose explanation is very important to describe if you are making a purchase order:
1.       Vendor ID: in this you will enter the id of your desired vendor to whom you’re writing this purchase order.
2.       Date: this is the date on which you’re making this purchase order.
3.       Good Thru: This is the date by which you want the goods delivered to you.
4.       PO No: It is very important that you write Purchase Order Number so the software had a record of your purchase order that it has been made.
The other boxes can be explained with the help of following image:

Here an example of purchase order is given. You can see that:
5.       Terms: This column contains statement “2% 10.Net 30 Days” this means that if you will pay the amount to your vendors within 10 days you will avail 2% discount.
6.       Discount Amount: This is the total amount of discount that you will avail.
7.       Ship Via: N/A.
8.       A/P Account: Accounts payable account is selected automatically because you are purchasing something on credit.
9.       Quantity: How much amount of unites you want to purchase.
10.   Receive: The amount that you’ve already received from your vendor.
11.   Item: The code that you’ve given to your item.
12.   Description: The nature of the product.
13.   GL Account: The inventory account is already selected.
14.   Unit Price: The Price of 1 Mobile Phone.
15.   Amount: The total amount of mobile phones.
After this you can save the purchase order by clicking on the save button on the top of this window or by clicking “Alt+S”.
The next step is “Purchase Received Inventory”. You can open it by clicking on the task button and clicking on it:
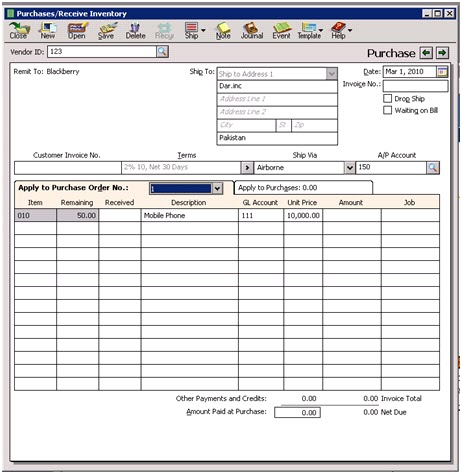
By clicking on it the following window will appear on your computer screen:

From here you will click on the “look up” button and you will click on the desired vendor eg:

You will see that the tab will be changed from “Apply to Purchases” To “Apply to Purchase Order No:”
And from the drop down button you will select the purchase order number:

From here you can see how much good are delivered to you and how much are not. You’re also required to write the invoice number on the top.
You can also look at the journal entry relating to this purchase order just by clicking on the “Journal” button that is avail able on the top of the window.

Friday, 26 April 2013

How to maintain inventory items in Peachtree Software:

1st execute the software and from the maintain button click on the “Inventory Items” software as shown in the figure below:


After clicking on that the following window will appear on your computer screen:

In this window you need to fill the following details.
1)        Enter an ID for your item in item ID.
Note: THE ID’S CAN’T BE REPEATED.
2)     Enter name of that item in description. For example: Chairs, Tables, and Generators etc.
3)     Select a price level for that item from a given list of prices from price level list means that would be        the minimum price at which you will sale your item.
4)     Select tax type for that item. Whether it is flammable, breakable, Perishable etc.
5)     Mention the cost of last purchased item that you paid.
6)     Select a cost method from given list, it may be LIFO, FIFO and Average but by default it will be FIFO.
7)     Mention these accounts that will effected when ever you made an transaction.
·         That accounts are
·         GL sales account
·         GL inventory account
·         GL cost of sales account
8)     UPC/SKU is American goods delivery companies you can let this space blank.
9)     Is this item is perishable, fire hazard or danger item write it down here.
10)Location of this item in store room will be mention here.
11)In which unit you measure this product should be mention here in this window.
12)  Per unit weight of your item should be mentioned here.
13)Mention the minimum stock and reorder level for that product should be mentioned here. It will give you an alert massage when ever inventory goes down.
14)In preferred vendor ID write the ID of your vendor.
15)In buyer ID write that ID that your vendor gives to you in his books of accounts.

The next Tab is “ Custom Fields” , here you can enter the information related to your Vendor and this information can be edited from “Default Information” button.

After that the next tab is of history , this tab will show you all your transactions related to purchase or sale of inventory from the date of recording.

Tuesday, 16 April 2013

How to maintain, enter , edit or amend the information about our vendors:

1st step you will execute the software and the following windows will appear on your computer screen:


After that go to the maintain tab and select the option of vendor:


After selecting the option the following windows will appear on your computer screen:


All the information is same as I've mentioned in my old blog post “how to maintain customers”.
In the above windows we will write the vendor’s ID and then the name of the vendor and in the general tab we will provide all the information about our vendor which will be useful for us to contact our vendor.
After that there is the tab of Purchase Default:

From this tab we will just select the account that will be affected due to our purchases:


Whenever we will purchase our inventory account will be debited as it is mentioned in the charts of accounts.
The next tab is Custom Fields as shown below:


In this tab you can enter the information about your vendors.
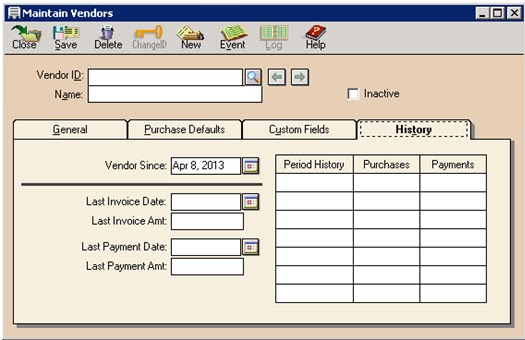
The history tab will show you all the transactions with you vendors in the past:


The next step is how to edit, enter or amend the information regarding your vendors:

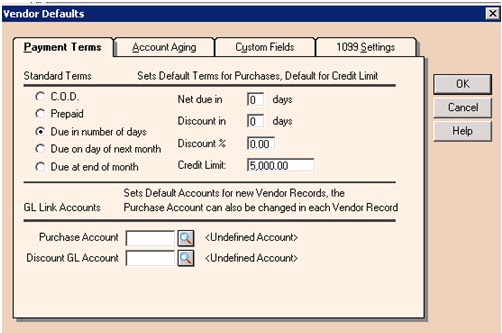
After selecting the option of vendor the following window will appear on your computer screen:

This window contains different terms listed under “standard terms” and they are explained below:
1.       Payment Terms:
All the terms and conditions regarding the payment from our customers will be mentioned here.

By default the option that is selected is “Due in number of days” and next to it the related information is provided Net due in (days), Discount in (days), Discount %, Credit limit.
The term that is selected shows us that the amount of payment will be due in 30 days and if the customer pays us the amount within 10 days then he can avail 2% discount on the payment.
Accounting Presentation: “2/10,n/30”.
Now the other options that are available for you to select are C.O.D: in the below image you can see that the 1st three columns are freeze and only the column of credit limit is active. This shows that we are not giving any discounts to our customer and we are just receiving the Cash onDelivery (C.O.D).


When you will select the option of Prepaid the following windows will appear and in this window again all the columns are freeze except Credit Limit. This option means you will receive the payment from the customers in advance and deliver the goods after that.

If we select the option “Due on day of next month”  this means that we will receive payment from our customer in the coming month e.g if we make sales in March then we will receive the payment from them in April and the information will be provided in the next columns.

And last if we select the option of “Due At end of month” then it means that we will receive the payment at the end of the month during which we have made the sales.


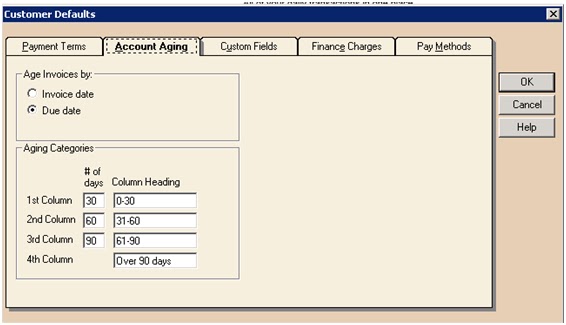
2.       Account Aging:
By selecting this option following window will appear on your computer screen.


In this option we do the forecasting of our bad debts and we can see this tab is further divided into 2 options: “Age Invoice by and Aging Categories”
In age invoices by the invoice date is showing that we will set the date to when the invoice is generated. And by selecting due date we are setting the time when our invoice date will be expired.
The Aging Categories portion is the one where we categorize the time periods.
3.       Custom Fields:
As I've explained before that there was a column in which you can enter extra information about customers and also can edit the questions or explanations that you want to add regarding your customers so for that you use the following tab.


Sunday, 7 April 2013

How to edit, enter or amend the information about our customers:

After learning how to maintain customers/prospects, now we will learn how to edit, enter or amend the information in that particular portion.
First you've to start the software and the following window will appear on your computer screen:


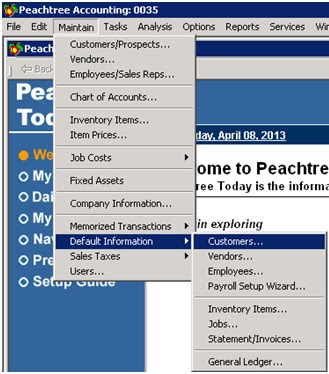
You can see there are different tabs on the top of the window. You have to click the maintain button and after that select the option of default information and the sub-option customers. It is shown in the image below:


After selecting this option the following window will appear on your computer screen:


Now this window again consists of different tabs as you can see on the top of the window. The main heads are:
1.       Payment Terms.
2.       Account Aging.
3.       Custom Fields.
4.       Finance Charges.
5.       Pay Method.

1.       Payment Terms:
All the terms and conditions regarding the payment from our customers will be mentioned here.
By default the option that is selected is “Due in number of days” and next to it the related information is provided Net due in (days), Discount in (days), Discount %, Credit limit.
The term that is selected shows us that the amount of payment will be due in 30 days and if the customer pays us the amount within 10 days then he can avail 2% discount on the payment.
Accounting Presentation: “2/10,n/30”.
Now the other options that are available for you to select are C.O.D: in the below image you can see that the 1st three columns are freeze and only the column of credit limit is active. This shows that we are not giving any discounts to our customer and we are just receiving the Cash onDelivery (C.O.D).


When you will select the option of Prepaid the following windows will appear and in this window again all the columns are freeze except Credit Limit. This option means you will receive the payment from the customers in advance and deliver the goods after that.


If we select the option “Due on day of next month”  this means that we will receive payment from our customer in the coming month e.g if we make sales in March then we will receive the payment from them in April and the information will be provided in the next columns.


And last if we select the option of “Due At end of month” then it means that we will receive the payment at the end of the month during which we have made the sales.


2.       Account Aging:
By selecting this option following window will appear on your computer screen.


In this option we do the forecasting of our bad debts and we can see this tab is further divided into 2 options: “Age Invoice by and Aging Categories”
In age invoices by the invoice date is showing that we will set the date to when the invoice is generated. And by selecting due date we are setting the time when our invoice date will be expired.
The Aging Categories portion is the one where we categorize the time periods.

3.       Custom Fields:
As I've explained before that there was a column in which you can enter extra information about customers and also can edit the questions or explanations that you want to add regarding your customers so for that you use the following tab.


4.       Finance Charges:
This tab can be used to charge our customers with extra amount that they have delayed the payment of goods. To activate this tab 1st you will click on the check box. All the information regarding the charges will be explained here. If you want to print the statement of charges then it can also be displayed on the invoice.