Friday, 26 April 2013

How to maintain inventory items in Peachtree Software:

1st execute the software and from the maintain button click on the “Inventory Items” software as shown in the figure below:


After clicking on that the following window will appear on your computer screen:

In this window you need to fill the following details.
1)        Enter an ID for your item in item ID.
Note: THE ID’S CAN’T BE REPEATED.
2)     Enter name of that item in description. For example: Chairs, Tables, and Generators etc.
3)     Select a price level for that item from a given list of prices from price level list means that would be        the minimum price at which you will sale your item.
4)     Select tax type for that item. Whether it is flammable, breakable, Perishable etc.
5)     Mention the cost of last purchased item that you paid.
6)     Select a cost method from given list, it may be LIFO, FIFO and Average but by default it will be FIFO.
7)     Mention these accounts that will effected when ever you made an transaction.
·         That accounts are
·         GL sales account
·         GL inventory account
·         GL cost of sales account
8)     UPC/SKU is American goods delivery companies you can let this space blank.
9)     Is this item is perishable, fire hazard or danger item write it down here.
10)Location of this item in store room will be mention here.
11)In which unit you measure this product should be mention here in this window.
12)  Per unit weight of your item should be mentioned here.
13)Mention the minimum stock and reorder level for that product should be mentioned here. It will give you an alert massage when ever inventory goes down.
14)In preferred vendor ID write the ID of your vendor.
15)In buyer ID write that ID that your vendor gives to you in his books of accounts.

The next Tab is “ Custom Fields” , here you can enter the information related to your Vendor and this information can be edited from “Default Information” button.

After that the next tab is of history , this tab will show you all your transactions related to purchase or sale of inventory from the date of recording.

Tuesday, 16 April 2013

How to maintain, enter , edit or amend the information about our vendors:

1st step you will execute the software and the following windows will appear on your computer screen:


After that go to the maintain tab and select the option of vendor:


After selecting the option the following windows will appear on your computer screen:


All the information is same as I've mentioned in my old blog post “how to maintain customers”.
In the above windows we will write the vendor’s ID and then the name of the vendor and in the general tab we will provide all the information about our vendor which will be useful for us to contact our vendor.
After that there is the tab of Purchase Default:

From this tab we will just select the account that will be affected due to our purchases:


Whenever we will purchase our inventory account will be debited as it is mentioned in the charts of accounts.
The next tab is Custom Fields as shown below:


In this tab you can enter the information about your vendors.
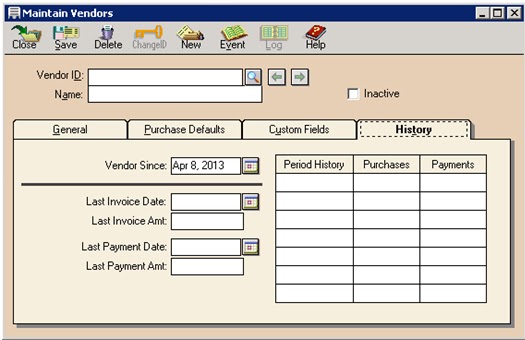
The history tab will show you all the transactions with you vendors in the past:


The next step is how to edit, enter or amend the information regarding your vendors:

After selecting the option of vendor the following window will appear on your computer screen:

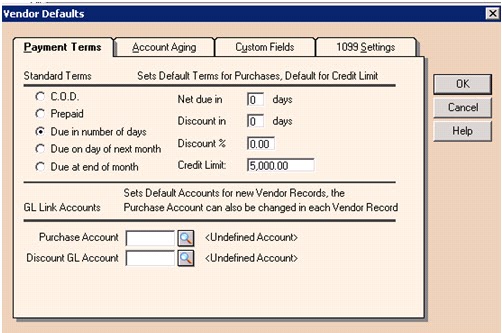
This window contains different terms listed under “standard terms” and they are explained below:
1.       Payment Terms:
All the terms and conditions regarding the payment from our customers will be mentioned here.

By default the option that is selected is “Due in number of days” and next to it the related information is provided Net due in (days), Discount in (days), Discount %, Credit limit.
The term that is selected shows us that the amount of payment will be due in 30 days and if the customer pays us the amount within 10 days then he can avail 2% discount on the payment.
Accounting Presentation: “2/10,n/30”.
Now the other options that are available for you to select are C.O.D: in the below image you can see that the 1st three columns are freeze and only the column of credit limit is active. This shows that we are not giving any discounts to our customer and we are just receiving the Cash onDelivery (C.O.D).


When you will select the option of Prepaid the following windows will appear and in this window again all the columns are freeze except Credit Limit. This option means you will receive the payment from the customers in advance and deliver the goods after that.

If we select the option “Due on day of next month”  this means that we will receive payment from our customer in the coming month e.g if we make sales in March then we will receive the payment from them in April and the information will be provided in the next columns.

And last if we select the option of “Due At end of month” then it means that we will receive the payment at the end of the month during which we have made the sales.


2.       Account Aging:
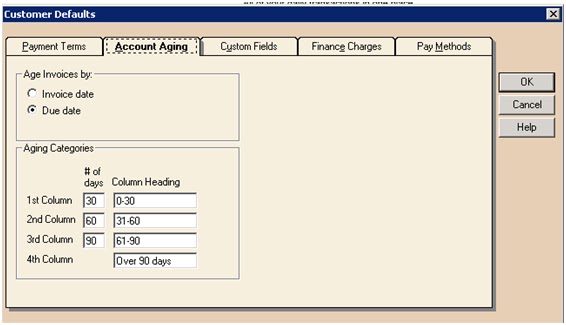
By selecting this option following window will appear on your computer screen.


In this option we do the forecasting of our bad debts and we can see this tab is further divided into 2 options: “Age Invoice by and Aging Categories”
In age invoices by the invoice date is showing that we will set the date to when the invoice is generated. And by selecting due date we are setting the time when our invoice date will be expired.
The Aging Categories portion is the one where we categorize the time periods.
3.       Custom Fields:
As I've explained before that there was a column in which you can enter extra information about customers and also can edit the questions or explanations that you want to add regarding your customers so for that you use the following tab.


Sunday, 7 April 2013

How to edit, enter or amend the information about our customers:

After learning how to maintain customers/prospects, now we will learn how to edit, enter or amend the information in that particular portion.
First you've to start the software and the following window will appear on your computer screen:


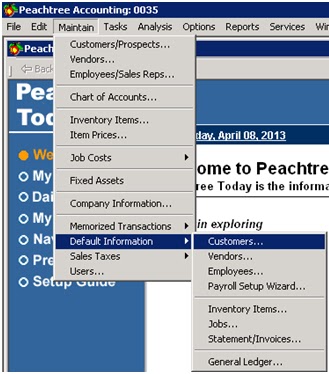
You can see there are different tabs on the top of the window. You have to click the maintain button and after that select the option of default information and the sub-option customers. It is shown in the image below:


After selecting this option the following window will appear on your computer screen:


Now this window again consists of different tabs as you can see on the top of the window. The main heads are:
1.       Payment Terms.
2.       Account Aging.
3.       Custom Fields.
4.       Finance Charges.
5.       Pay Method.

1.       Payment Terms:
All the terms and conditions regarding the payment from our customers will be mentioned here.
By default the option that is selected is “Due in number of days” and next to it the related information is provided Net due in (days), Discount in (days), Discount %, Credit limit.
The term that is selected shows us that the amount of payment will be due in 30 days and if the customer pays us the amount within 10 days then he can avail 2% discount on the payment.
Accounting Presentation: “2/10,n/30”.
Now the other options that are available for you to select are C.O.D: in the below image you can see that the 1st three columns are freeze and only the column of credit limit is active. This shows that we are not giving any discounts to our customer and we are just receiving the Cash onDelivery (C.O.D).


When you will select the option of Prepaid the following windows will appear and in this window again all the columns are freeze except Credit Limit. This option means you will receive the payment from the customers in advance and deliver the goods after that.


If we select the option “Due on day of next month”  this means that we will receive payment from our customer in the coming month e.g if we make sales in March then we will receive the payment from them in April and the information will be provided in the next columns.


And last if we select the option of “Due At end of month” then it means that we will receive the payment at the end of the month during which we have made the sales.


2.       Account Aging:
By selecting this option following window will appear on your computer screen.


In this option we do the forecasting of our bad debts and we can see this tab is further divided into 2 options: “Age Invoice by and Aging Categories”
In age invoices by the invoice date is showing that we will set the date to when the invoice is generated. And by selecting due date we are setting the time when our invoice date will be expired.
The Aging Categories portion is the one where we categorize the time periods.

3.       Custom Fields:
As I've explained before that there was a column in which you can enter extra information about customers and also can edit the questions or explanations that you want to add regarding your customers so for that you use the following tab.


4.       Finance Charges:
This tab can be used to charge our customers with extra amount that they have delayed the payment of goods. To activate this tab 1st you will click on the check box. All the information regarding the charges will be explained here. If you want to print the statement of charges then it can also be displayed on the invoice.


Monday, 1 April 2013

How to maintain the customers / prospects:


After maintaining the charts of accounts and learning how to enter the beginning balances in the peachtree software, now we will learn how to maintain the customers / prospects. This information will help us to identify the customers to whom we want to sell our products.
The 1st step is we will execute the peachtree software and the following window will appear on your computer screen:


 After this we will click on the maintain tab and select the customer / prospects as shown in the figure below:


After selecting it the following window will appear on your computer screen:


Now such windows are displayed by the computer or any software if you want to add more information in one place. There are different tabs available in this window and above that there are 2 blank columns customer ID and Name. You will fill these both columns with the information that is related to your customer e.g.

The explanation regarding the tabs is given below:

1.      General:
In This tab the 1st column of contact is used to enter the name of the person (customer) to whom you can contact anytime for receiving or providing the information. Next to it there is drop down button. Initially it is showing you “Bill to Address” this means the address of the place where the invoice will be sent.
When you will click on the button the following options will appear:


The ship to address option is used to provide the address where your goods will be sent, it could be same as address of bill to order. The only thing that is new in this option is the ship name:


 In the column of ship name you will write the name of the dock or port where you want to receive your goods.
The Column of customer type is used as a filter (screening process). It helps us to reach our desired category of the customer.
  
2.      Sales Default:


 After selecting the “Sales Default” tab the above mentioned window will appear on your computer screen. This is a very important step: After adding the Customer ID and Name you should select the “GL Sales Acct” and you will select the sales account from you charts of accounts, if you forgot to select it then this customer ID will not be saved by the software. e.g:


After selecting the concerned charts of account you will be able to save it and to save the id just press “Alt+S”.
The 1st column “Sales Rep” is the sales representative, in this column we will enter the person who is responsible for our sales and with whom our suppliers can contact, in simple words a person who acts like an agent.
The 3rd column is “Open P.O #” is purchase order number. It shows us the purchase order number which is send to us by our customer.
The column of pricing level is there to set our different level of prices for our different customers. e.g: Selling of goods on premium and discount.

3.      Payment Default:


This column contains all the information of the person who is going to pay for the products. All the headings are easy to understand no further explanation is required.
  
4.      Custom Fields:


All the information in the other tabs was not change able but this tab will help you to customize the information you can change all the steps according to your own desire.

5.      History:


This column will show you the transactions that have been occurred in past.

Thursday, 21 March 2013

How we can maintain charts of accounts & Enter beginning Balances on peachtree software:

We are making the charts of accounts by ourselves because we when we’ve started the company we have chosen the option that we will manually enter the charts of accounts:
1st you will execute the software. Following window will appear on your computer screen:


In this window you can see there are different buttons on the top left corner of the screen.
By clicking on the maintain button the option of charts of accounts will appear.


By clicking on the chart of accounts option following window will appear on your computer screen:

The main heads in this window are:
1.       Account ID.
2.       Description.
3.       Account Type.
4.       Inactive.
1.       Account ID:
In this column you will write a numeric code for your maintained accounts of your financial statements. This can help you to search or locate the desired account in future.
2.       Description:
In this column you will write the name of the account. For example: Cash, Land, Building etc.
3.       Account Type:
In this column you are not allowed to write, you should select any suitable option and the nature of the account. For example: cash, accounts receivable, accounts payable.
4.       Inactive:
The inactive option will allow you to stop or start the posting in a specific account. By checking it you are now allowed to enter or no transaction will be recorded in that account vice versa.

Sample Charts of Accounts
100
Current Assets


Account Type
105
Cash in bank


Cash
109
Petty cash


Cash
110
Accounts receivable


Accounts Receivable

The above mentioned column is just taken to show the examples of posting in chart of accounts:

In above table you can see that every desired information is entered in the related colums. Now to save the account you have to press “alt+S” key.
Other accounts:


NOTE: in the above mentioned examples you can see the inactive box is not checked, so it means you can enter or record the data in that account.
After you have added all the accounts in the charts of accounts you can see all the entered accounts just by clicking the “look up button” which is right next to the account ID column.

Following is the example of the accounts maintained by me:

Deleting an account:
If you came to know that you’ve entered an account that is not necessary for your company then you can delete it. 1st you are required to select that particular account and you can do it just by clicking on the lookup button (explained before).when that account is selected you will click the delete button, the computer will ask for your confirmation and by clicking yes the account will be deleted.


Example:

Changing ID of an account:
If you want to change the ID/code of your account then it is also a very easy process. 1st select the account by clicking on the “look up button”. After this click on the change ID button and the option will be provided to you. By clicking ok you’re good to go.
Example:

After adding all the accounts and doing amendments in the accounts you can check the status of all the accounts:
Go to the reports button and select general ledger:


After this, 2 sections will appear on the computer screen:

From report area you will select general ledger => and then from report list you will select the chart of accounts option. All the chart of accounts that have been maintained /entered by you in the software will appear and their status will also be shown whether an account is active / Inactive.
Example:


NOTE: 0035 is representing the company’s name from which it is entered in software.


After maintaining the charts of accounts now its time that we learn that how to enter the amounts in the charts of accounts:
If you are an employee in any company then you will be provided by a trial balance, and with the help of these balances you will report the data in the charts of accounts.
A Trial balance is shown below:
Trial Balance e as on 1st January 2010 is as follows:

100
Cash
             100,000
110
Accounts Receivable
             150,000
120
Inventory
             200,000
130
Prepaid Rent
               12,000
150
Machinery
             500,000
161
Accumulated Depreciation: Machinery
               50,000
200
Accounts Payable
             120,000
210
Salaries Payable
               20,000
300
Capital
             352,000
310
Retained Earnings
             100,000
400
Sales
             600,000
500
Cost of Sales
             250,000
600
Salaries Exp
               10,000
601
Rent Exp
               10,000
602
Depreciation Exp
               10,000

Total
         1,242,000
         1,242,000

Now here the numeric digits are the account ID’s that will help you allocate the desired account if in future you want to amend any values in the account.
After making the charts of accounts, you will click on the beginning balances button and a small window will appear on your screen containing different time intervals as shown in the picture:
As you've stated all the heads in the charts of accounts, in the same sequence all the heads will appear in this section and you have to enter the amounts


Now from this picture you will choose that slot from which your balances are occurred / these balances were closed. As the trial balance is on 1st January, 2010 this means that the entries were closed on 31st December, 2009 so we will take the slot of “from 12/1/2009 through 12/31/2009”.
Before you proceed you should know that you have reported a retained earnings account in your char of accounts because the differences from the debit and credit balance will be reported there and if the account will be missing then the software will not accept your data and give you an error.
After selecting the slot (by clicking on it) following window will appear:


This sheet is divided into 5 portions. We are familiar with “Account ID” , “Account Description” and “Account Type. The next two columns are of “Assets, Expenses” and “Liabilities,Equity,Income” which are debit and credit columns respectively. After entering all the values in the concerned accounts you've to save the particular task. You can save it by clicking on the “OK” button on the top left corner of this window of just use short-cut key “alt+O” and your work will be saved and the software will show you the current months closing balance and next months opening balance.